Showing posts with label coasters. Show all posts

Berry Stitch Dishcloth


These crochet dishcloths are perfect for cleaning the dishes or any kitchen surfaces. They are easy to make, can use any leftover yarn (cotton is preferred as it absorbs well and can be washed at high temperature in the washing machine). You can do them in any sizes and bring colors in your kitchen.

Don't lose this pattern - add it to your Ravelry queue


*** This pattern is free. You may sell the products you make from my patterns but not the pattern itself. If you sell items from this pattern please link back to this post. Do not copy and repost this pattern or any of the photos and claim them as your own. ***


This pattern uses US crochet terms.

Yarn: Cotton preferred, I used leftovers from Drops Paris and Drops Loves You 5
Hook size: 4.5mm (hook size conversion chart)
Stitches used: sc, ch
Finished size: 5.5in x 5.5in (14cm x 14 cm) for the small square, 8in x 7 in (20cm x 18cm) for the big dishcloth. I made it double sided so it can be used as hot mat.


Abbreviations:
ch - chain
sc - single crochet
st - stitch


Pattern:

Chain even number of stitches (22 for the small dishcloth, 32 for the big one), sc in second st from hook, sc in each ch, ch 1, turn.
Row 1: Sc in the same st, * ch 3 in next st, sc in next st *, repeat *-* till end, ch 1, turn.
Row 2: Sc in each st till the end, ch 1, turn.
Row 3: Sc in same st, sc in next st, *ch 3 in next st, sc in next st*, repeat * - * till 2 st left, sc in the last 2 st, ch 1, turn.
Row 4: Repeat row 2. 


Repeat row 2, 3, 4 for the pattern and make the dishcloth as long as you want.
The big one is double sided - the back side is made of sc only.

Border: The border is just a row of sc around the dishcloth, each corner is made of 3 sc in the corner stitch.


Find me on 

Print Friendly and PDF

Colorful coasters and hotpads


Finally spring - time to clean up, reorder ... and why not completely renew the kitchen with new crocheted coasters, hotpads and dishcloths:)
I have just finished this beautiful kitchen set in different colours. It is a fast crochet project where you can use the scrap yarn you have from other projects.  


*** This pattern is free. You may sell the products you make from my patterns but not the pattern itself. If you sell items from this pattern please link back to this post. Do not copy and repost this pattern or any of the photos and claim them as your own. ***

This pattern uses US crochet terms.

Yarn: 100% cotton. You can use any yarn, however the cotton is the most suitable for the kitchen - it absorbs well and can be washed in washing machine on high temperature. 
Hook size: 4mm/G or whatever is suitable for your yarn (hook size conversion chart)
Stitches used: ch, sc, ltc, reverse sc
Finished size: 10x10cm (4x4 in) for the coasters

Abbreviations:
ch - chain
sc - single crochet
rsc - reverse sc
yo - yarn over

Notes:
The linked treble crochet(LTR) is very easy stitch. There is detailed photo tutorial below how to make it, you may also check this post "How to Make Linked Treble Crochet".

Reverse single crochet is also very easy - it is just single crochet stitch but from left to right, check the photos in the pattern on how to make it.

Colours used - one for the base solid square, white for the inner border and grey for the outer border.

Only solid squares:


Pattern:

Row 1:Ch 19, insert the hook in the second ch from hook and pull a loop, then do the same for the next 2 chains (4 loops on the hook). Now finish like a normal tr - yo, pull through two loops, yo, pull through two loops, yo and pull through the last two loops. First LTR st made.


Now for the next - insert the hook in the first horizontal loop of the ltr you just made and pull a loop, do the same for the second horizontal loop and pull another loop, next insert the hook in the next ch and pull a loop - 4 loops on the hook. Finish like normal tr - yo, pull through two loops, yo, pull through two loops, yo and pull through the last two loops. This is the second ltr, now make ltr till the end of the row (16 st). Turn.


Row 2:
This a row of sc st. 
Ch 1, sc in same st, sc in the next st and in each st till the end of the row (16 st). Turn.


Row 3:
Ch 3, insert the hook in the second ch from hook and pull a loop, then insert the hook in the 3rd st from hook and pull a loop, insert the hook in the first st and pull a loop (4 loops on hook), finish like normal tr - yo, pull through two loops, yo, pull through two loops, yo and pull through the last two loops. First LTR st made.


Insert the hook in the first horizontal loop of the ltr and pull a loop, then insert it in the second loop and pull another loop, insert the hook in the next st and pull a loop (4 loops on the hook). Finish like normal tr. Make on ltr in every st till the end of the row (16 st). Turn.

Row 4, 6, 8: Repeat row 2.

Row 5, 7, 9: Repeat row 3.


Do not cut the yarn yet. Make a round of sc all around the square, then cut the yarn and weave in the ends.

Join white.
Row 1 (white): Ch 1 and make a row of sc with white all around the square. Work *sc, ch, sc* in the edge stitch, sc in each other st. End with ss in the first ch.
Row 2 (white): Ch 1, make a second row of sc with white around the square. Work *sc, ch, ch, sc* in each of the 4 edges. Finish off with ss in the first ch. Cut the yarn and weave in the ends.

Join grey.
Ch 1, sc in the same st. Now make a round of reverse sc - instead of going to left your next st is the stitch to the right ( this way ---------->).
At the edges make losely rsc, ch, ch, rsc. End with ss in the first chain.


That's all.

Find me on 

Print Friendly and PDF

How to crochet simple cord


Have you ever wondered how to create crocheted cord or a rug with some fine yarn you have?
If you do then this tutorial is just for you.

Many projects and especially amigurumi projects may require from you to make a thin crocheted cord - some bugs body or antennas, plant stalk or different accessories like bracelets and necklaces, bag handles.
Sometimes you want to crochet a rug but you can't find any suitable yarn with that thickness.
Once you learn how to crochet cords you can simply use any yarn you want to create first a cord of it and then crochet a rug. 

You may use any yarn and hook, just make sure to do a bigger starting chain than needed.


Pattern:
Chain any number of stitches - if you plan to create a rug from crocheted cord simply go with the whole ball of yarn. While making chains make a ball with the chained cord. 


Once you are done with the ball now go back.


Ch 1 and ss in the next stitch, continue ss in next st till end. Turn.


Ch 1, now insert the hook in the starting loop and the lower loop of the st made in the last row and yo, pull through both loops, continue the same way till the end.


That is all - now you may use the cord made for necklaces, bracelets, amigurumi projects or instead of t-shirt yarn for rugs.


Crocheting with the cord - you may easily do any rug, or any small project.


Find me on 

Print Friendly and PDF

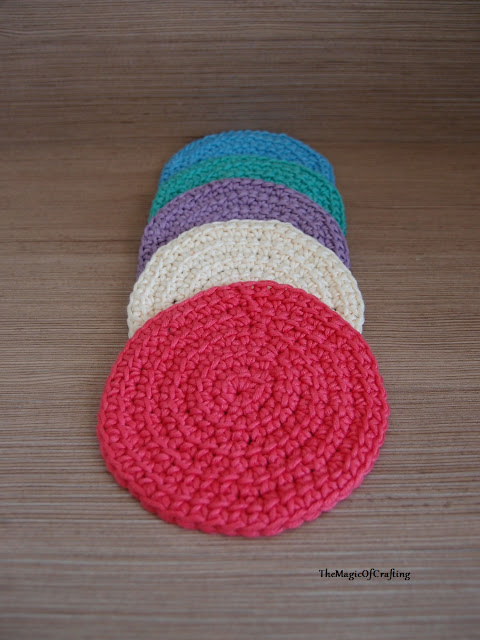
Linked DC Coasters


This set of coasters is very simple yet different. They are made of linked double crochet stitches and there is a detailed photo tutorial how to do ss for linked double crochet stitch.


*** This pattern is free. You may sell the products you make from my patterns but not the pattern itself. If you sell items from this pattern please link back to this post. Do not copy and repost this pattern or any of the photos and claim them as your own. ***

This pattern uses US crochet terms.

Yarn: whatever you want, I would suggest using cotton if you do coasters or any kitchen crochet. 
Hook size: suitable for the yarn you are using. I'm using here cotton yarn for hook size 3.5mm/D with G hook (hook size conversion chart)
Stitches used: ldc
Finished size: 4in/10cm


Pattern

Round 1:
Start with magic cicle and chain 2. Insert the hook in the second chain from hook and draw a loop.


Then insert the hook into the magic circle and pull a loop (3 loops on hook). Now finish off like a normal dc stitch - yo pull through 2 loops, yo pull through the rest 2 loops.


First ldc made. Now to make another ldc insert the hook in the horizontal loop from the last stitch and draw a loop (see the picture below).


Then insert the hook into the mc and draw another loop. Finish off like normal dc - yo, pull through 2 loops on the hook, yo, pull through the rest two loops.
Another ldc stitch made. Now make 6 more ldc (8 ldc + starting chain).


End this round with special ldc ss. A normal ss won't work here as it makes a nasty hole in the project. Instead insert the hook from the center of the circle up in that loop of the starting chain that is semi-horizontal. 


Yo and draw through 2 loops. Yo again and draw through the rest two loops.


Now we are at the same height as the other stitches, ss in the starting ch 2 st to finish off the round (10 ldc)


Round 2:
Ch 2, ldc in same stitch (insert hook in second ch from hook and draw a loop, then into the same st and draw second loop, then finish like normal dc), work 2 ldc in each stitch, finish with ldc ss (20 ldc).

Round 3:
Ch 2, ldc in same stitch, repeat *ldc in next st, 2 ldc in next st* till the end of the round, finish with ldc ss (30 ldc).

Round 4:
Ch 2, ldc in same stitch, repeat *ldc, ldc, 2 ldc* till the end of the round, finish with ldc ss (40 ldc).


Round 5:
Ch 2, ldc in same stitch, repeat *ldc, ldc, ldc, 2 ldc* till the end of the round, finish with ldc ss (50 ldc).

You may add more rows following the same pattern or even continue to make a hat.


Find me on 
Print Friendly and PDF
Related Posts Plugin for WordPress, Blogger...